Split column recipes: names, codes, addresses and lists
Recipes · By Tahir Nas · Examples run in our simulator · Published · Updated
Split at the last space (surname last)
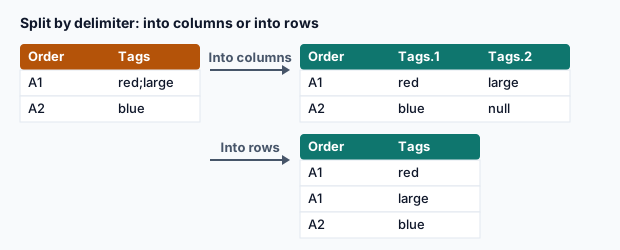
"Mary Ann Lee" split at every space gives three pieces. Splitting at the last space keeps the given names together:
Table.SplitColumn(
    #table({"Name"}, {{"Mary Ann Lee"}, {"Ben Okafor"}, {"Cleo"}}),
    "Name",
    Splitter.SplitTextByEachDelimiter({" "}, QuoteStyle.None, true),
    {"Given", "Family"}
)
Result
| Given | Family |
|---|---|
| Mary Ann | Lee |
| Ben | Okafor |
| Cleo | null |
Output produced by the Power Query Exercises simulator, an independent implementation of a documented subset of M.
true starts from the end. A single name leaves Family null; decide whether that's a given or a family name.Several possible delimiters
Table.SplitColumn(
    #table({"Tags"}, {{"red,large"}, {"blue;small"}, {"green"}}),
    "Tags",
    Splitter.SplitTextByAnyDelimiter({",", ";"}),
    {"Colour", "Size"}
)
Result
| Colour | Size |
|---|---|
| red | large |
| blue | small |
| green | null |
Output produced by the Power Query Exercises simulator, an independent implementation of a documented subset of M.
Fixed positions (codes with a known layout)
A product code like GB2026KT0042 has country (2), year (4), family (2) and number (4). When the layout is guaranteed, split by positions:
Table.SplitColumn(
    #table({"Code"}, {{"GB2026KT0042"}, {"DE2025RL0107"}}),
    "Code",
    Splitter.SplitTextByPositions({0, 2, 6, 8}),
    {"Country", "Year", "Family", "Number"}
)
Result
| Country | Year | Family | Number |
|---|---|---|---|
| GB | 2026 | KT | 0042 |
| DE | 2025 | RL | 0107 |
Output produced by the Power Query Exercises simulator, an independent implementation of a documented subset of M.
Split into rows
For a list of items in one cell, split into a list and expand to rows. This keeps one row per item and repeats the other columns:
let
    Orders = #table({"OrderID", "SKUs"}, {{"A-1", "K-01, R-02"}, {"A-2", "L-03"}}),
    Lists = Table.TransformColumns(Orders, {{"SKUs", each List.Transform(Text.Split(_, ","), Text.Trim)}}),
    Rows = Table.ExpandListColumn(Lists, "SKUs")
in
    Rows
Result
| OrderID | SKUs |
|---|---|
| A-1 | K-01 |
| A-1 | R-02 |
| A-2 | L-03 |
Output produced by the Power Query Exercises simulator, an independent implementation of a documented subset of M.
Splitting into rows changes the grain of the table: one order became two rows. Keep that table separate from order-level amounts, or totals will double. The same caution applies to every list expansion.
When the number of pieces varies a lot (tags, recipients, product codes), splitting into rows is almost always better than splitting into columns. Columns force you to guess the maximum number of pieces, and next month's data will exceed it.
Before you split
- Trim first, or leading spaces create empty first pieces.
- Decide how many output columns you need; extra pieces are dropped silently.
- For addresses, prefer extracting known parts (postcode at the end) over splitting everything; address formats vary too much.
Practise it in the simulator
Each task opens the exact exercise in the browser workspace and is checked against fresh data, not just the example. These tasks are part of Pro.
Related pages
Lessons
More resources
Function reference
Sources
Microsoft's official documentation for the features and functions used on this page.
- Split columns by delimiter (Concept, Microsoft Learn)
- Text functions (Concept, Microsoft Learn)
- Table.SplitColumn (Function reference, Microsoft Learn)
- Splitter.SplitTextByEachDelimiter (Function reference, Microsoft Learn)
- Splitter.SplitTextByAnyDelimiter (Function reference, Microsoft Learn)
- Splitter.SplitTextByPositions (Function reference, Microsoft Learn)
- Table.TransformColumns (Function reference, Microsoft Learn)
- List.Transform (Function reference, Microsoft Learn)
- Text.Split (Function reference, Microsoft Learn)
- Table.ExpandListColumn (Function reference, Microsoft Learn)
Power Query Exercises is an independent educational platform and is not affiliated with, endorsed by, sponsored by, or approved by Microsoft Corporation. All third-party trademarks belong to their respective owners.